Rack Pulls
What Is A Rack Pull
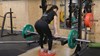
The rack pull is a hip hinge exercise that does what it says on the tin – the aim is to pull the barbell from the rack to a standing position. Whereas other deadlift variations are set up on the floor, the rack pull requires the barbell being positioned on a squat rack around knee height.
Like other deadlift variations, rack pulls will target your hamstrings, glutes, quads, and erector spinae. However, it has much less range of motion than other deadlifts and could be considered a partial deadlift. Because of this reduced movement, they do not incorporate as much leg drive as the conventional or sumo deadlift and have greater focus on the upper back muscles such as the rhomboids and traps.
If you want to focus on building back and grip strength, rack pulls can be a great addition to your programme. This strength will carry over well to other pulling movements and deadlift variations.
Commonly Asked Questions On Rack Pulls
-
Rack pulls are a full body movement that targets all the posterior chain, forearms, and quads. The greatest emphasis is placed on the back muscles, hitting the erector spinae, trapezius, and latissimus dorsi.
-
Rack pulls increase pulling strength, grip strength, and posterior chain strength, which can improve your strength in other deadlift variations and pulling exercises like rows or pulldowns. Because of the partial range of motion, the barbell can be loaded much heavier.
The reduced range of motion used in rack pulls also places less stress on the spine than other deadlifts which can be helpful if you’re returning from or are wary of a back injury.
-
Neither rack pulls or deadlifts are better or one than one another – they simply work different parts of the body.
Rack pulls may be better for individuals who want to focus more on back strength, as they place a greater focus on the back and can be loaded heavier than a deadlift can. If you’re struggling to progress pulling exercises like pull downs, rows, and even deadlifts, adding rack pulls can help you to progress. Rack pulls can also be more suitable for beginners who are learning the hip hinge movement, and anyone with certain back injuries.
Deadlifts are a better alternative for anyone who wants to place a greater focus on the hamstrings, glutes, and quads, or simply gain more strength more efficiently.
-
When performed correctly, both rack pulls and deadlifts are safe movements. As with any lifts, your risk of injury can increase if the form you have adopted is incorrect or if you are lifting a load heavier than you can manage.
While rack pulls will place less emphasis on the lower back than other deadlift variations, if other deadlift variations are done correctly, they should not cause injury.
If you’re new to deadlifting, it might be worth practising rack pulls first to understand how to maintain a neutral spine and master the hip hinge before progressing to other deadlift variations.
Rack Pull Tips
It’s important to set the barbell up in the correct position to ensure the correct muscles are targeted and injury risks are minimised during a rack pull.
Set the rack too low and you may not be able to maintain a neutral spine which can risk damage to the spine, or you may end up mirroring the movement of a conventional deadlift instead. Set the bar too high and you won’t target the intended muscle groups effectively.
Try placing the bar just above or below the knee to see which feels better for you – both are fine, so it’s down to preference.
Rack pulls place less pressure on the lower back than other deadlift variations, but it’s still important to ensure a neutral spine throughout the lift by remaining close to the bar at all times, pinning the shoulder blades back, and bracing your core.
How To Do A Rack Pull
-
Set up the barbell in the rack on the safety pins, so that the barbell sits just below or above the knee. Approach the barbell with a hip width stance as if standing ready to take a jump straight up in the air. To ensure that your feet are in the correct position, consider where your shoelaces are tied and stand with them directly under the bar.
-
Once you’ve found your stance, push your hips back and bend your knees slightly to grip the bar just outside of hip width, next to your shins. We would advise using a pronated grip so that your palms are facing downward to avoid muscular imbalances.
Some people prefer a mixed grip as it can allow you to lift more and avoid grip fatigue. If you choose this approach, make sure to swap the grip of each hand to avoid imbalances.
-
The final preparation for the deadlift requires the chest to lift and the scapula to be retracted. To do this, sit further into the deadlift ensuring your hips sit higher than your knees but lower than your shoulders.
To lift your chest up, pull your shoulder blades together as if you’re trying to hold a pencil between them. You’ll want to try and keep your shoulder blades in this position for the entirety of the lift. With your chest up and scapula down, your shins should now be vertical to the floor and your armpits sitting directly above the bar.
-
Once you’ve found your grip and stance position, keep your feet planted and your grip on the barbell strong before pinning your shoulder blades back to create a neutral spine. Your shins should now be vertical to the floor and your armpits sitting directly above the bar.
Your set up is now complete and you’re ready to do a rack pull! Take a deep breath in, allowing your stomach to push outwards and your core to become rigid, then drive through both feet, imagining pushing the ground away from you, similar to how you would when using the leg press machine.
As the bar rises, push your hips forward and squeeze the glutes and hamstring as you reach full lock out of the hips. Use your back muscles to keep the barbell as close to your legs as possible throughout the lift.
-
To reverse the pull, maintain your neutral spine with the shoulder blades pinned back before pushing your hips back and hinging until the barbell is resting safety pins again.
-
Reset your positioning and revise steps 3 and 4 before starting your next rep.
If you’re not sure if any of the above exercises are suitable for you, please consult your doctor before you start it. Need guidance on how to perform the exercise? Ask a personal trainer at your gym.